Demo Script CIO
Use case summary
The objective of this demonstration is to highlight the platform's user interface and administrative functionalities, showcasing the ease of user registration, login procedures, and the navigation experience for both standard users and administrators. By guiding participants through the process of creating a user, logging in to explore the home page, and then transitioning to an administrative role to explore backend capabilities, the demo aims to illustrate the platform's versatility and user-friendliness. It emphasizes the seamless transition between user roles and the comprehensive control and oversight provided to administrators, demonstrating the platform's capability to cater to a wide range of user needs and administrative tasks efficiently.
Demo Flow
Create a User:
Begin by registering a new user on the platform. This involves entering required information such as name, email, and creating a password.
Confirm the user creation through an email verification link or a similar validation method provided by the platform to ensure the authenticity of the registered user.
Login as a User:
After creating and verifying the new user account, proceed to log in using the newly created credentials.
This step demonstrates the authentication process and grants access to the user-specific features of the platform.
Explore the Home Page:
Once logged in, navigate through the home page to explore the various user-centric features, resources, and services available.
Highlight key functionalities, access to services, and any personalized content or recommendations that enhance user experience.
Logout:
Complete the user session by logging out. This action should securely terminate access to the user account and return to the login or home screen.
Login as Admin:
Using administrator credentials, log into the platform to access the admin-specific interface.
This step is crucial for demonstrating the enhanced capabilities and oversight features available to platform administrators.
Explore the Admin Page:
Within the admin interface, review and highlight the comprehensive suite of tools and settings available for platform management.
Focus on the functionalities that allow for user management, content control, system settings adjust
Pre-Requisites
An official Document issued to you
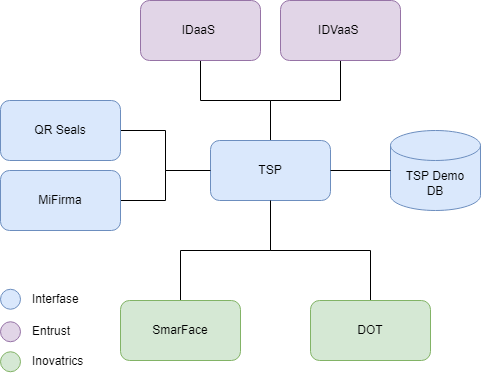
Architecture
Instructions
Create User
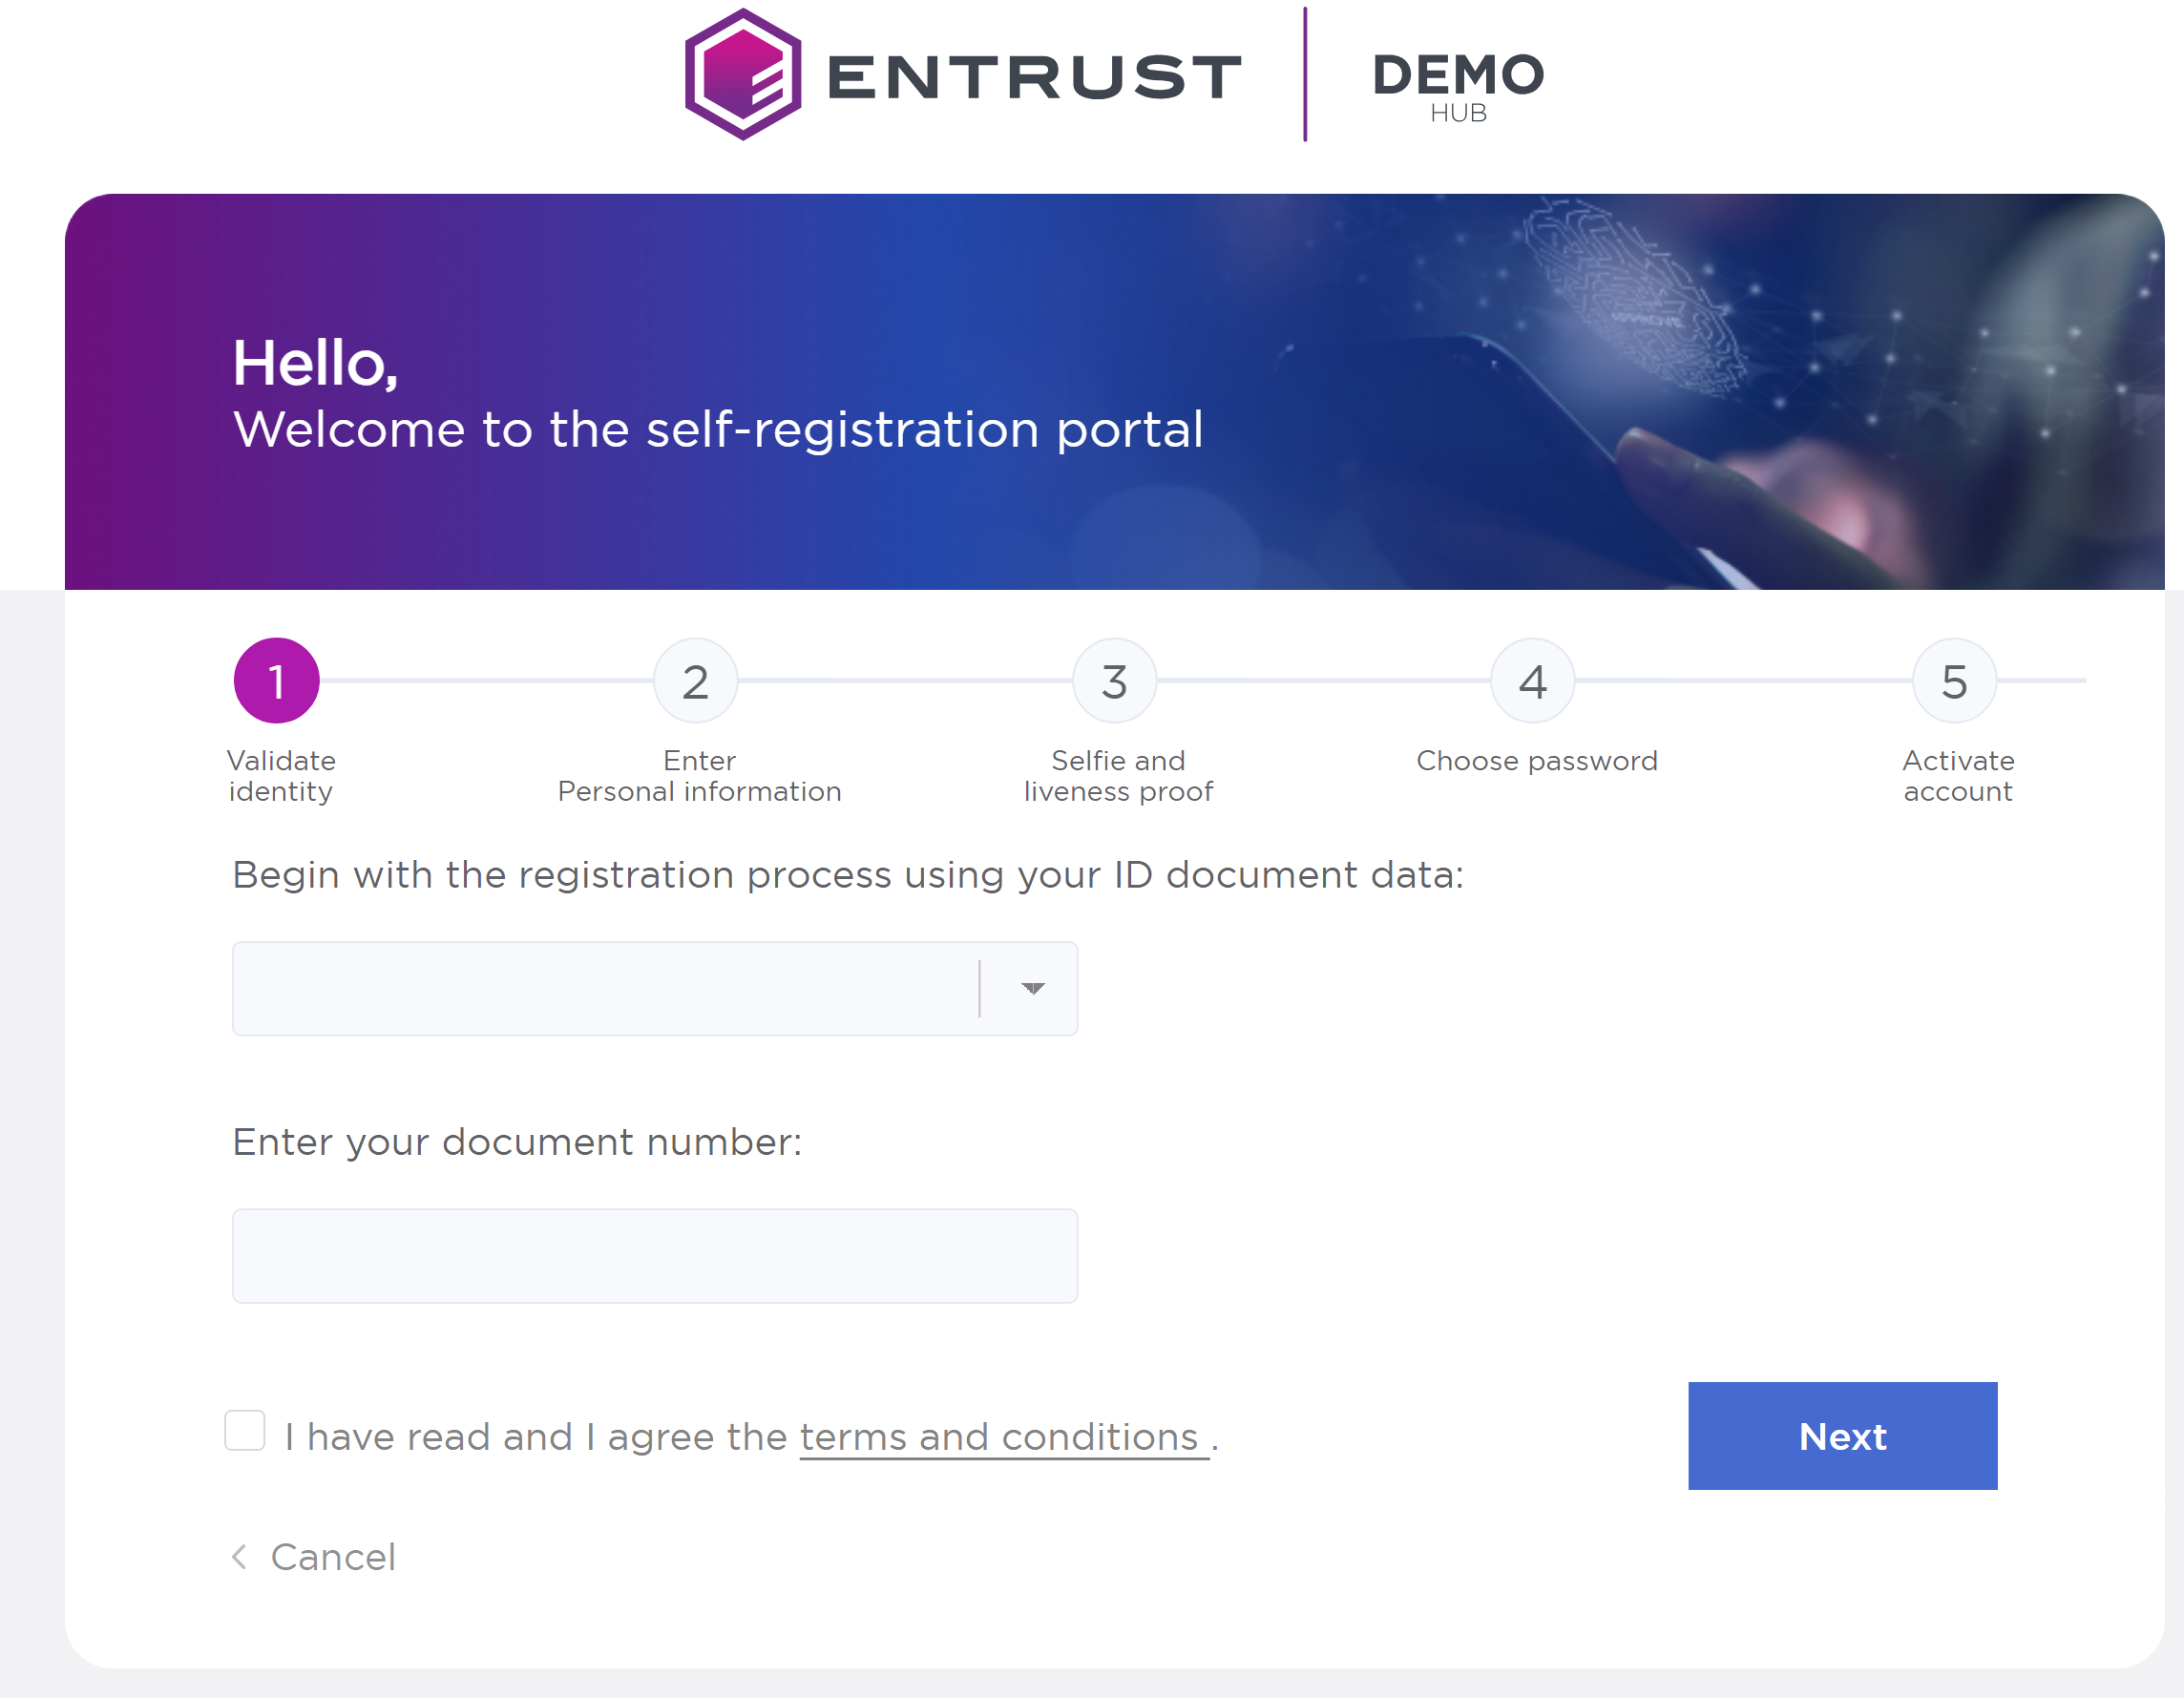
Access https://tspdemo.interfase.uy/user/auth (CIO web application)
Click on [Get Started Now]
Validate Identity
Select your country of origin
Write your Document ID number (Ej. 1234567)
Click [I have read and I agree on the terms and conditions.]
Click on [Next]
Personal Information
Fill [First Name] (ej.:Juan)
Fill [Last Name] (ej.:Demo)
Fill [Cell phone Name] (ej.:95123456)
Fill [Email] (Use any email you have access to)
Select [Entity (Registration Authority)] “Demo Registration authority”
Click on [Next]
Selfie and Liveness
Using your webcam take a picture of your face to validate your identity
You can skip this step. Doing so will create a user with a registration level of 1 instead of 2.
Choose a password
Fill [Enter new password](ej.: Pass.1234)
Fill [Confirm password](ej.: Pass.1234)
Click on[Next]
Access your Email to activate your account
Click [Access ISCert]
Login to CIO
Click [Login]
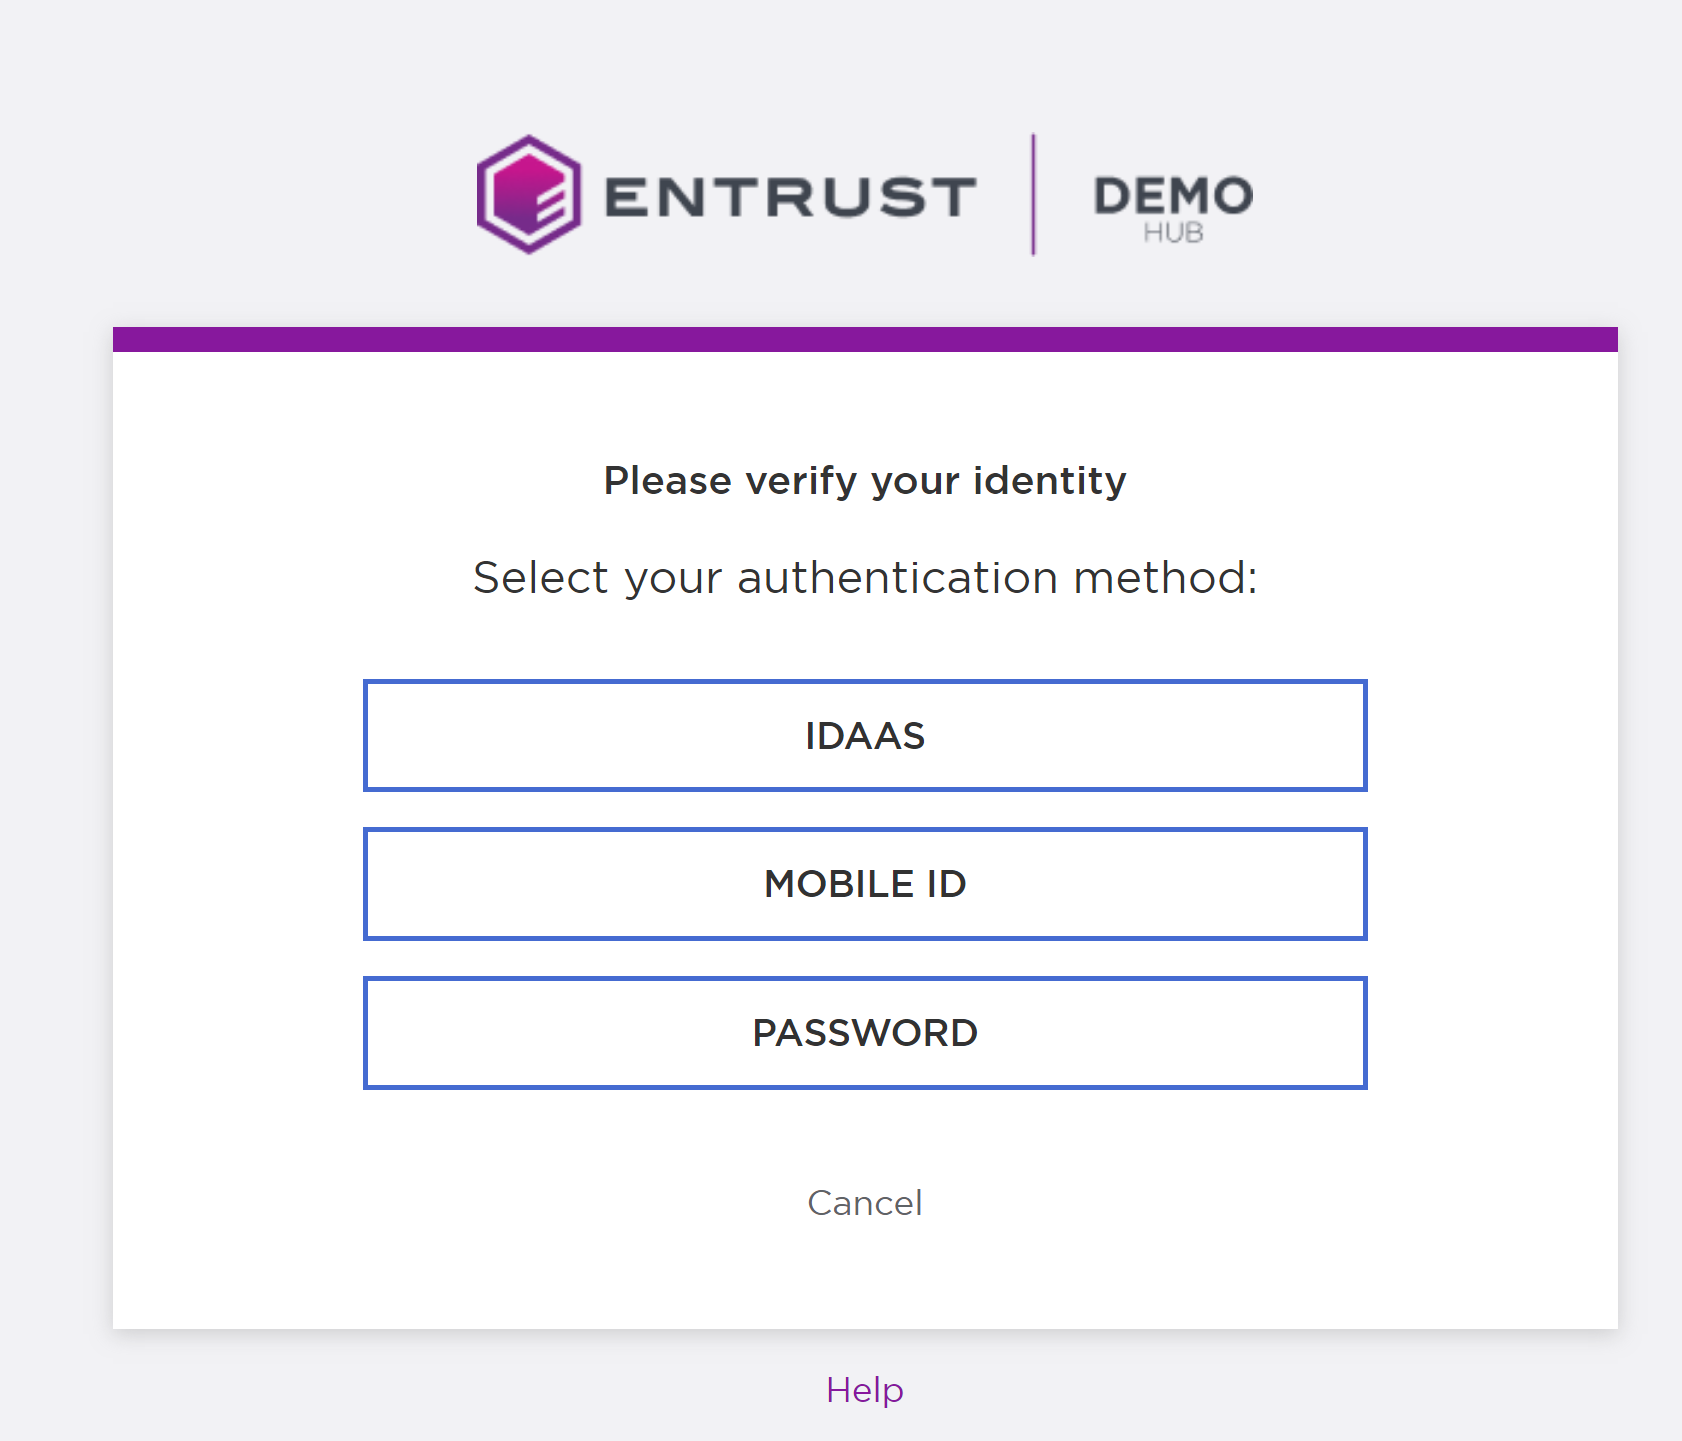
Select [Password]
You can also use the mobile app if you have it
Login using your ID
Click on [Next]
Fill in your password
Pick a PIN
Fill [New PIN](ej.: 1234)
Fill [Reapet PIN](ej.: 1234)
Explore the Home page
Take this chance to explain each element on the user portal
Sign a Document
Go to [Utilities] and click [Sign Document]
Click on [Sign Document]
Click on [Select file .pdf]
Select PDF
Adjust parameters as necessary
Click on [Sign]
Tic [I have read the document]
Tic [Display information on the data to be signed]
Click on [Continue]
Click on [Continue]
Write your PIN
Click on [Next]
In order to download the signed document
Click on [Download or share]
Click on [Download]
Close the session
Click on
Log in as an admin user
Click on [Other Access-> Admin Portal]
Use User (admin)
Password (Isa.1234)
Click on [Login]
Explore the Admin Portal
Show [Dashboard]
Sistem Summary
Show [Users]
List of users
Show [Security -> Roles]
You can and or modify users' roles
Using the mobile App
Download the App https://play.google.com/store/apps/details?id=uy.com.interfase.iscerttsp.demo (Android only for now)
Open the app
Log in with your user and password
Sign PDF using a mobile App
Click on [Sign PDF]
Use your PIN
Select Document
Select [Sign]
Sign
Click on [Continue]
Position Signature
Click on [Continue]
Tick [I have read the document]
Tick [Display information on the data signed]
Click on [Continue]
Use your PIN
Download /Show document
Biometric Authentication
On the home screen tap the area with “Tip: Record your face biometrics to increase your account security”
Select [National ID Document]
Scan your ID
Take a Selfie